 Eye-tracking is a method that gets a lot of attention.
Couple fancy (and expensive) equipment with a method that feels like peering into a customer’s thought process and you’ll get interest.
Eye-tracking is perceived as something akin to a lie detector mixed with an MRI. After all, the eyes don’t lie!
But eye-tracking is not a panacea. Like many UX methods, it can be misused or misapplied. So much so that Jared Spool has said he’d rather have an Ouija board than eye-tracking software.
Eye-tracking outputs some compelling visualizations that executives love. But this executive eye-candy, while compelling, is often not enough to effectively answer research questions.
Despite its reputation of all flash and no substance, eye-tracking has the ability to answer certain research questions other methods cannot. It’s most effective when the visuals are combined with other metrics or data the eye-tracking software produces.
Seeing eye movements and locations allows researchers to know whether elements are within a participant’s visual field. That’s a necessary, although not sufficient, step for determining whether participants perceive and understand design elements.
For example, if users don’t click a button, eye-tracking can tell you if the button is even in the gaze path of users. If the button is in the gaze path, participants likely aren’t perceiving it or are misinterpreting its purpose.
Visualizations
Here are four visualizations (eye-candy) and how to apply them to help answer research questions.
1. Heatmaps
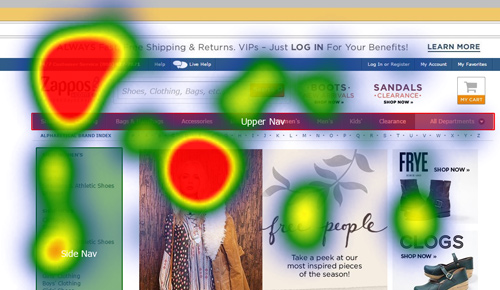
A view of where one participant (or every participant) in a study looked is called the heatmap. A heatmap is similar to a weather map except instead of temperatures, fixations are plotted. Fixations are places where participants look for 100 to 500 ms (a tenth to half-a-second). The “hotter” the colors (redder) the more participant fixations are in one area. The heatmap in Figure 1a is from one participant that viewed the Zappos homepage and 1b shows 13 participants.
![]()
Figure 1a: Heatmap of one participant on Zappos.
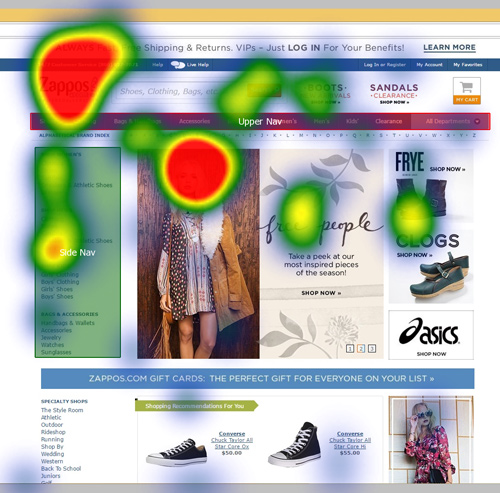
Figure 1b: Heatmap of 13 participants on Zappos.
2. Focus Maps
The more fixations, the more the heat can obscure details on what people are looking at. An alternative visualization is the focus map (what SMI calls it). It’s essentially the inverse of the heatmap in Figure 1a. More fixations lead to a clearer view of the page. Darker areas indicate fewer fixations.
![]()
Figure 2: Focus map of one participant from Figure 1a.
3. Gaze Path Plots
An underutilized power of eye-tracking is the ability to add the dimension of time. Most eye-tracking technology has the ability to connect fixations to provide the path a participant scans as they view the screen. These gaze path or scan path plots allow the researcher to see what items interest the participant and when the participant is looking at them. They can be viewed as a static image (Figure 3) or as a movie (Figure 4) or as a. Larger circles represent longer fixations.
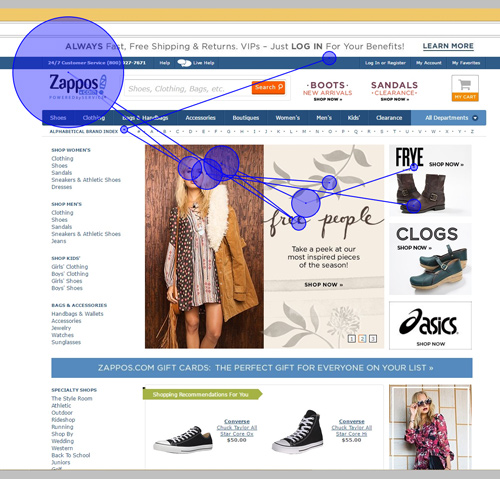
Figure 3: Still image of a scan-path for one participant.
![]()
Figure 4: Scan path of one participant (slowed down to half-speed).
4. Aggregated Gaze Path Plots
Combining gaze paths provides a whole bag of eye-candy (Figure 5). It can be engaging but overwhelming for an audience. For the right research questions it can help. We’ve found slowing down the gazes to show a slower progression of gaze paths for a subset of participants can reveal patterns we usually explore more thoroughly with the metrics.
![]()
Figure 5: Scan path of 13 participants (slowed down to half-speed).
Metrics
Eye-tracking visualizations are like maps used when planning a trip. Maps give you a good birds-eye visualization of your journey, but to answer questions more precisely (about how far and how long the trip will take), you need to incorporate the metrics of time and distance. The same idea applies to eye-tracking.
Instead of mapping a trip, you map out regions on the page (aptly called Areas of Interest or AOIs) and use fixations and time to more precisely determine where people are looking, and what they’re potentially perceiving.
Dwell Time
The total amount of time a participant fixates or simply glances within an AOI is called the dwell time. You can then compare the dwell times between AOIs or between designs. For example, Figure 6 shows the average dwell time for two designs across eight AOIs. We found participants spent statistically more time in the header, help area, and footer on the second design than the first one. This data, along with other task observations, helped us better understand the different experiences.
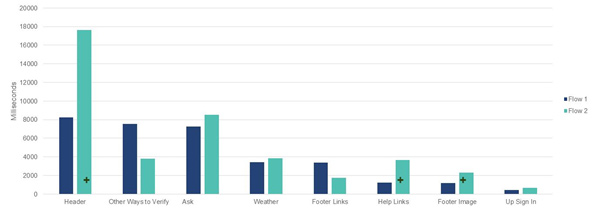
Figure 6: Mean dwell time across eight AOIs for two designs.
Fixation Count
The number of fixations within an AOI also becomes another metric to test hypotheses. We see similar results in Figure 7 with more participant fixations in the header, footer, and help links on the second design. The number of fixations provides similar, but not always the same, findings as dwell time.
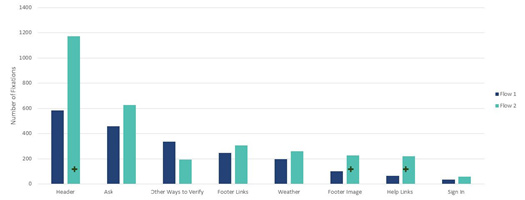
Figure 7: Mean fixation counts across eight AOIs for two designs.
Fixations themselves can also be further analyzed to help answer more precise research questions. For example, the average time until a participant’s first fixation in an AOI gives you some idea about how quickly participants notice an element on a page.
Summary
Eye-tracking can’t magically answer all UX research questions but knowing which elements are in participants’ visual field gives you some idea about perception. A good eye-tracking study mixes visuals with metrics to more definitively address research questions.
Common visualizations include heat maps (to see where people are looking), focus maps (to see where people are not looking), gaze paths (to see the path people take), and aggregated gaze paths (to see the paths multiple people take). Common metrics include fixations (quick looks) and dwell time (total time spent) within an area of interest.
